
In the previous post, the initial step in my garden design was to compile and analyze a lot of data, and to make many lists. Now, it’s time for pencils and paper, to bring unformed ideas into physical being. Drawing helps reveal problems, and is the means of working out those problems.
“Plan,” “drawing,” and “design” are verbs, and are also nouns. In other words, they are activities/processes that lead toward products, these being images, and the eventual garden itself.
First, I sketch a diagram, a broad overview of the scope.

concept diagram
I make a properly scaled base plan of existing features that are not going to change.

base plan
A series of overlaid sketch-plans roughly block out desired features, with generalized names, such as “inner sanctum,” “flowery flowers,” “low fragrant bed,” and “see-through greenery.” Ideas I can imagine, but have not yet figured out.
At this conceptual stage, drawings are loose and messy. There are question marks sprinkled around. “Cat mint?” “Wild ginger?” For these drawings, I frequently refer to my wish lists of plant choices, and put them on the plans near where they might belong.
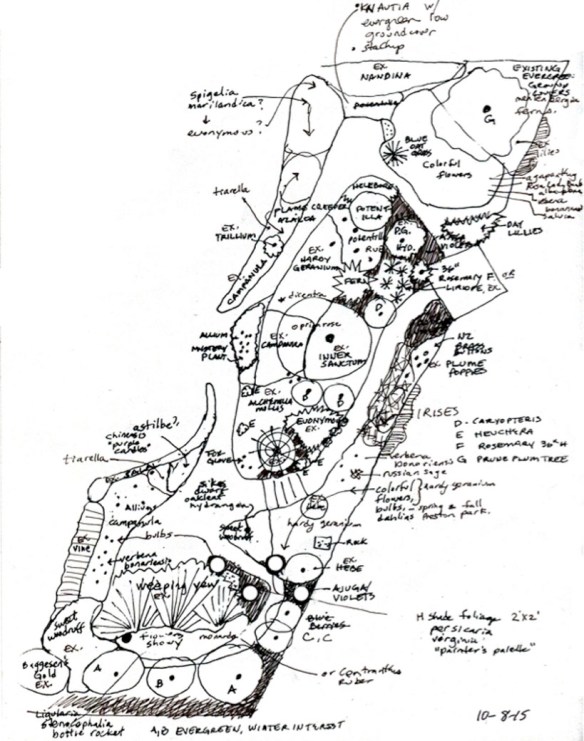
concept plan
Once I’ve dumped the initial brainstorm of ideas onto paper, it’s time to gently edit. The limitless possibilities need to be narrowed down. Each latest version of the concept sketch is overlaid with tracing paper, creating a series of sketches that coax the conceptual elements into more refinement and specificity. I literally imagine walking through the garden. And how various combinations will change through the seasons. Always seeking an ideal confluence of the plants’ habits with those of their neighbors and particular setting.
I focus on the compositions of individual areas, and also take an aerial view, looking at the whole yard as a complete unit. Jumping between scales brings out some rich possibilities.
And so, having discarded many options, and having drawn many iterations, I begin to feel pretty certain about some big decisions. I make a “milestone” plan, which is reasonably accurate in scale and layout, and somewhat specific in its details.

design decisions:
- The main circular path is extended to make a figure eight shape, increasing route choices.
- In a move away from my former “smattering” approach (many individual specimens competing for attention), I plan for large homogeneous plant drifts, each matched carefully to its micro climate. This is to both to simplify the visual rhythm, and to reduce maintenance.
- I take care to design-in space for the plants to grow without undue crowding. Unlike a house or other inanimate designed object, a garden is alive; it will grow and change over time.
From the schematic plan, I start a plant-shopping list. I develop the logistics of making the physical changes. I’ll need help clearing areas, potting up existing plants, relocating some existing plants and putting down a thick layer of overwintering mulch. I have worked with a particular landscape contractor over the years. For him and his crew, I prepare a drawing that shows the scope of work I want done.
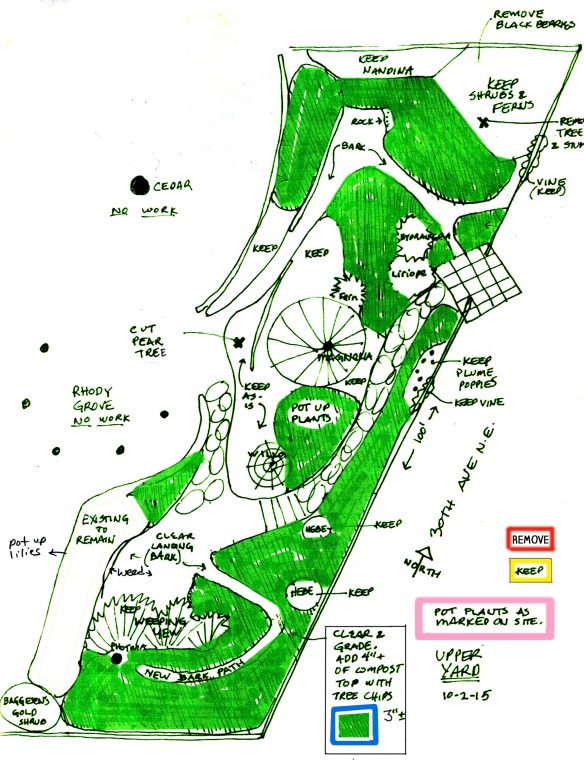
contract drawing for site preparation
- The contractor can use this plan for a fee proposal.
- Instructions for the workers are marked on the plan and also physically staked out in the garden with colored tapes, for which there is a laminated key:

In October of 2015, the contractor works on the garden for three days, efficiently making the changes shown in the contract drawing. In November and December, I plant the first round of new plants, mostly trees and shrubs.
Until spring arrives, there not much else to do in the yard, but there is plenty of time in which to ponder and finesse the plant selections. I retain Lisa Bauer of Chartreuse, a landscape designer, for a four-hour consultation, to review the schematic design. With her deep knowledge of plant performance, and an appreciation of my goals, she suggests a few changes that will improve the garden. For instance, she points out a drift of low shrubs with purple flowers. I show deciduous catmint. She suggests using all-season evergreen teucrium, instead. A good substitution, which I wouldn’t have considered without Lisa’s consultation.


catmint teucrium
they are similar in size, shape, and flowering habit, but one on right is green all year
The last drawing in this series is a master plan, which is well refined and annotated. It is as clear and specific as possible. It shows exact locations and quantities of each type of plant. It is a detailed record of my intentions. I laminate it, so I can take it outside and refer to it in the course of the subsequent phases.

In the spring, this idealized design will be subject to “real-world” factors: plant availability, and on-site aesthetic and practical judgment calls.
Feel free to share the content of this posting, but please provide a link back to 2H Pencil.
I invite your comments.

This is fantastic, Laura! I should have such an organized mind….. and perseverance to carry through.